
Once you have created a new task/hazard and saved the record, you would be able to carry out the initial assessment for the specific hazards/sub hazards selected. And whenever the hazard assessment is reviewed, you will conduct revised assessments through the Hazard management system.
Hazard assessment page displays a list of all linked hazards and sub-hazards at the top of the page. Hazard dropdown here would only display the hazards associated with the process/task (within hazard grid in process/task details page). Defaults to the topmost hazard.
Selecting a hazard ]should display all Hazard sub hazards that are linked to the hazard and linked to the selected process/task.
Status of the assessment is displayed adjacent to each sub-hazard.
Clicking on a sub-hazard from the list should display existing controls and risk assessment for the particular sub-hazard.
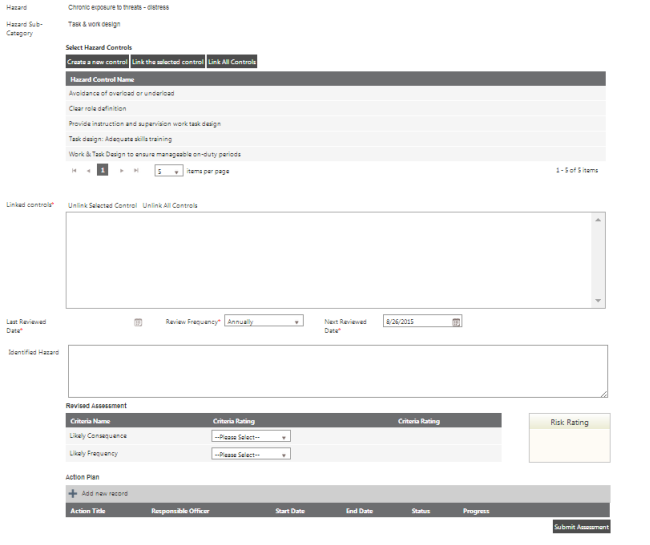
Hazard risk assessment would contain following fields.
|
Fields |
Description |
|
Link Existing controls grid |
Only existing controls for the selected sub-hazard will be displayed here. Select the control and click 'Link control' to link a control to the assessment. You may use the 'Link all controls' to link all displayed controls to the assessment. Linked controls will be displayed in a list below the grid. You may unlink any controls by selecting the control and clicking 'Unlink control'. A new control can be added depending on your permission level. Any controls added will be added to the Hazard settings> Controls section. Click 'Add new control', enter a title and a description and save the record. The control will automatically be linked to the hazard/ sub hazard of the current assessment. |
|
Review Frequency |
Display a set of frequencies. This would allow you to select a frequency that the assessment should be reviewed. |
|
Last reviewed date |
Display the date that the review was submitted last. This would be updated each time you review the assessment |
|
Next review date |
Display the next review date according to the review frequency selected. You may change the date manually if required. |
|
Initial/Revised Risk assessment |
The risk criteria configured in the system will be displayed here. You can select the suitable criteria ratings from the criteria rating drop down. Selecting the criteria will auto populate the risk rating according to the configurations provided for your prganisation. |
|
Action plan |
Display any actions added to the assessment. You may use add new record to add a new action. |
Clicking Save button from top will save the assessment. Clicking submit button at the bottom of the page will submit as a new assessment (create a new record). For example;
If the current assessment is
|
Assessment Date |
Updated date |
Assessed by |
Updated by |
Consequence |
Likelihood |
Risk Rating |
|
10/11/2013 |
10/11/2013 |
Joe |
Joan |
Minor |
Likely |
Moderate |
If Alan change the consequence to Major and save the assessment using the top save button, the same record will be updated
|
Assessment Date |
Updated date |
Assessed by |
Updated by |
Consequence |
Likelihood |
Risk Rating |
|
10/11/2013 |
14/11/2013 |
Joe |
Alan |
Major |
Likely |
Moderate |
If Alan change the consequence to Major and submit the assessment using the “Submit assessment” button at the bottom, a new assessment is created in the database.
|
Assessment Date |
Updated date |
Assessed by |
Updated by |
Consequence |
Likelihood |
Risk Rating |
|
10/11/2013 |
10/11/2013 |
Joe |
Joan |
Minor |
Likely |
Moderate |
|
14/11/2013 |
14/11/2013 |
Alan |
Alan |
Major |
Likely |
Moderate |
This is used to effectively track the risk changes within a timeframe.
To add an action to the Action Plan
STEP 1: Click on the Add New Record' button, and you will see a pop-up screen as shown below
STEP 2: Define the Action Title and describe the Resource Requirement.
STEP 3: Select the Responsible officer, Business Unit and Service Profile from the respective dropdown menus. Provide the Start Date and End Date for the action and Select the Reporting Frequency from the dropdown list.
STEP 4: Click on the 'Update' button to add the action plan to the task.
Updating/Editing an existing Action Plan
STEP 1: Click on the Action plan title which functions as the hyperlink to the action plan details pop-up screen.
STEP 2: You can edit all the fields which are described under the creation of a action plan. In addition to these option, you would see a section to update the progress of the action plan as well.
You can change the action status, percentage complete and progress comment.
STEP 3: Save the changes.
Copyright © 2014-2015 CAMMS Online Help. All rights reserved.
Last revised: November 26, 2017