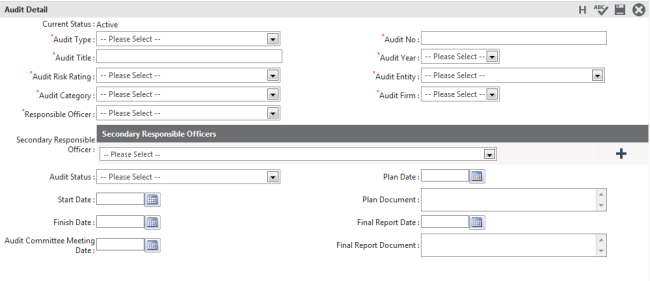
To create an audit, follow the steps below.
STEP 1: Navigate to Audit Management > Audits
STEP 2: Click plus icon to create a new audit record.

STEP 3: Use the below listed controls to enter audit details.
|
Field |
Description/Instructions |
Mandatory/Optional |
|
Current Status |
Current Status of the audit is displayed automatically. |
Mandatory |
|
Audit Type |
Choose whether the audit is OHS (external) or GOV (internal). |
Mandatory |
|
Audit No |
Automatically generated number to uniquely identify the audit. This numbering system is configured within Audit Settings > Numbering System. |
Mandatory |
|
Audit Title |
Enter a title. |
Mandatory |
|
Audit Year |
Select the audit year from a dropdown list. |
Mandatory |
|
Audit Risk Rating |
Select the risk rating. The Audit Risk Ratings options are specified within Audit Settings. |
Mandatory |
|
Audit Category |
Select the audit category. The Audit Categories options are specified within Audit Settings. |
Mandatory |
|
Responsible Officer |
Assign a Responsible Person who will be responsible for monitoring and reporting on the status of the audit. Dropdown shows staff list for selection. |
Mandatory |
|
Secondary Responsible Officers |
Select a secondary Responsible Person and click ‘Add’ to add him/her to the list of Secondary Responsible Officers. Multiple staff members can be selected. Dropdown shows staff list for selection. |
Optional
|
|
Audit Status |
Select the audit stage. The Audit Statues options are specified within Audit Settings. |
Optional |
|
Audit Entity |
Defines the audit entity from the drop down list. The Audit Entities options are specified within Audit Settings. |
Mandatory |
|
Audit Firm |
Select the audit firm. These are specified within Audit Settings. |
Mandatory |
|
Start Date/End Date |
Choose appropriate dates via calendar controls to start and end the audit. |
Optional |
|
Plan Date |
Select the relevant plan date via a calendar control. This date defines when the idea/plan for the audit originated. For example, the plan date might be 01st of Jan 2010 but the actual start date of the audit might 01st of June 2010. |
Optional |
|
Plan Document No |
Enter a unique number to the Plan Document. This creates a link to the detailed audit report. This link is also visible in the Recommendation page. To setup this feature, CAMMS requires the document management system URL of the organisation. Once configured, a unique number is assigned. Specify the number in this field to create the link. |
Optional
|
|
Audit Committee Meeting Date |
Select a date for the audit committee meeting via a calendar control. |
Optional
|
|
Final Report Date |
Select the due date of the final report of the audit. |
Optional
|
|
Final Report Document No |
Enter a reference number to the Final Report. This creates a link to the final audit report. This link is also visible in the Recommendation page. |
Optional
|
STEP 4: Click 'Save'.
|
|
Once this initial audit record is saved (click 'Save' button), a new tick box titled 'Active' is displayed allowing users to change the status of an audit. |
STEP 5: Now you can go on to specify findings for this audit. A Finding No is automatically provided by the system (depending on auto numbering rules set up by your Administrator) so enter a Background (brief introduction to the audit finding) and click 'Add'. The Finding No and Background are now hyperlinked and can be used to navigate to the Finding Detail page. Refer Detailing Findings for more information.
Copyright © 2014-2015 CAMMS Online Help. All rights reserved.
Last revised: November 26, 2017