
Using this section you can define the email notifications for any general notices, actions, tasks or KPIs.
This section allows you to carry out the following activities:
Creating a new email notification
Editing or deleting an existing email notification
Activating or Deactivating an email notification
Navigate to this section through Administration >Email Notifications > Email Notification tab.
STEP 1: Click on the 'Add' icon to start creating an email notification
STEP 2: Fill the following details to define the email notification.
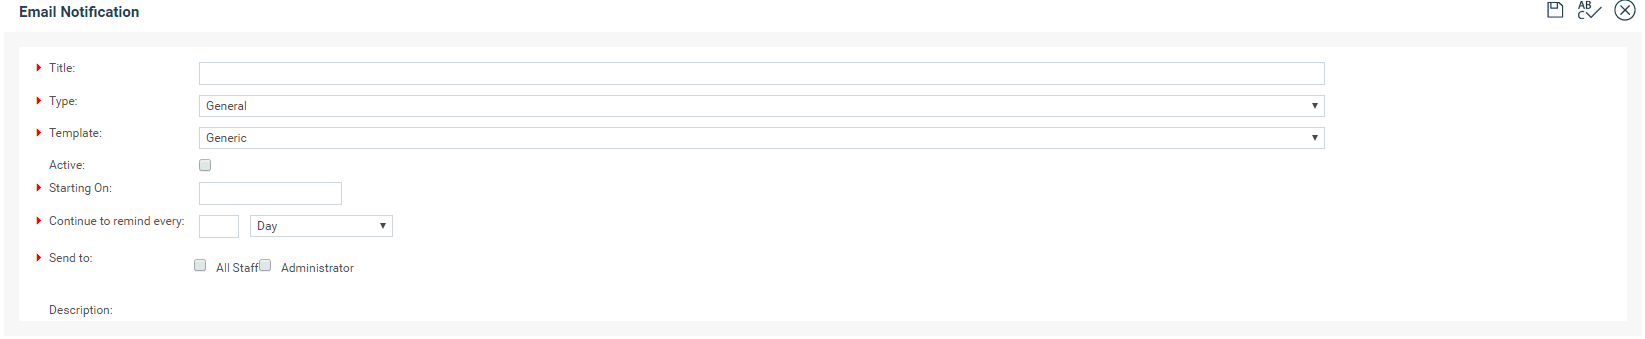
1. Generic Email Notification
|
Field |
Description |
|
Title |
Define the title for the email notification |
|
Type |
Select the type of notification from the dropdown menu (I.e. General, Action, Task and KPI) |
|
Template |
Choose the template to be used, from the dropdown menu (templates can be edited/added under email templates tab, the dropdown menu will only provide the list of templates that was created for the relevant email type) |
|
Active |
Select the tick box if you wish to activate this email notification |
|
Starting On |
Provide a date to start sending the notification NOTE: The 'starting on date' will need to be updated if you have completed a rollover and re-started your actions. |
|
Continue to remind every |
Decide the frequency of the notification from the dropdown menu. NOTE: If you choose the option as 'Never', still the email notification will be sent on the start date and will not generate any further email notification as the condition given to the email notification is not to send out alerts to remind again. |
|
Send To |
Select the recipient. The options available are all staff. |
General email notification details screen is shown below:
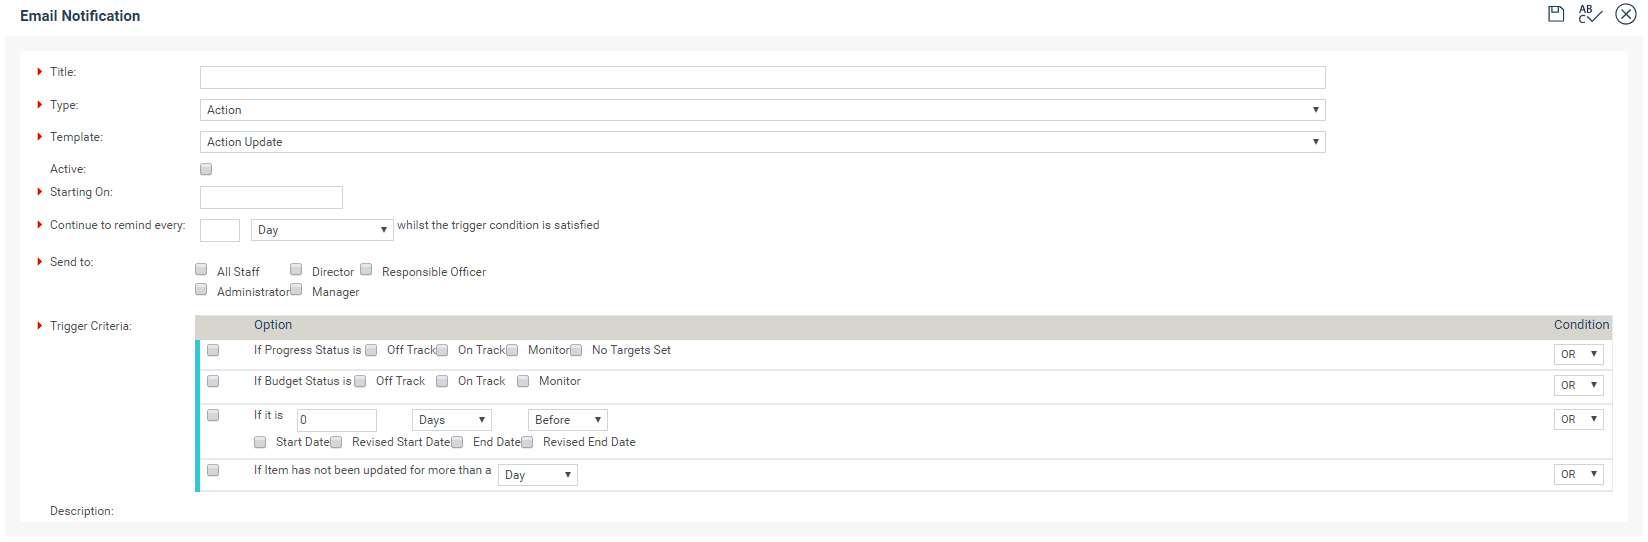
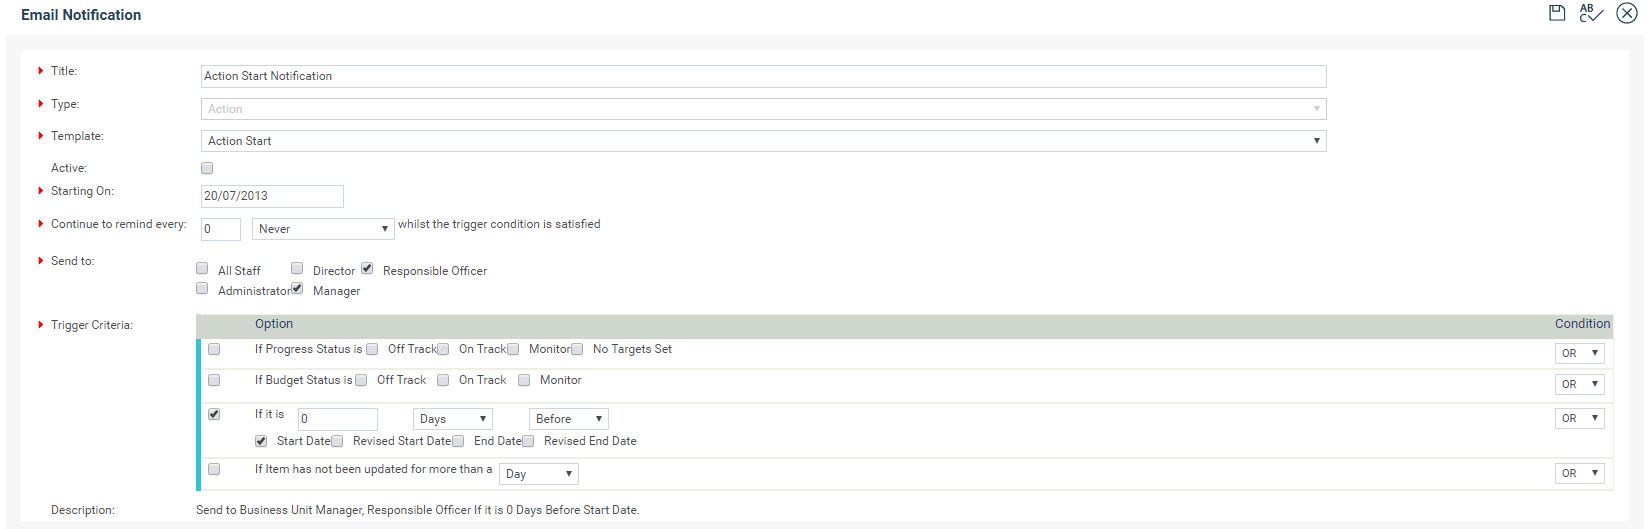
2. Action Email Notification
|
Field |
Description |
|
Title |
Define the title for the email notification. |
|
Type |
Select the type of notification as Action. |
|
Template |
Choose the template to be used, from the dropdown menu (templates can be edited/added under email templates tab, the dropdown menu will only provide the list of templates that was created for the relevant email type). |
|
Active |
Select the tick box if you wish to activate this email notification. |
|
Start On |
Provide a date to start sending the notification. NOTE: The 'starting on date' will need to be updated if you have completed a rollover and re-started your actions. |
|
Continue to remind every |
Decide the frequency of the notification from the dropdown menu. NOTE: If you choose the option as 'Never', still the email notification will be sent on the start date and will not generate any further email notification as the condition given to the email notification is not to send out alerts to remind again. |
|
Send To |
Select the recipient. The options available are All Staff, Director, Responsible officer, Administrator and Business Unit Manager |
|
Trigger Criteria |
Define the trigger criteria using the options and conditions given in the grid. The options column gives you the list of situations in which an email can be triggered and each criteria row includes tick boxes and drop down menus to define the criteria/situations better. These criterias can be combined using the conditions drop down (OR/AND) given against the options. The default selection for the conditions dropdown menu is OR. Select the criteria row by ticking the check box on the left side of the row. this enables that specific trigger criteria. then you can select the options using the tick boxes or dropdown menus available in the same row. Also, you can use the conditions dropdown to combine the criteria NOTE: when a criteria is selected using the left side check box, you have to use at least one of the options available under that criteria (tick boxes or dropdown menus within the row) to define email trigger, failing which you will receive an error message when trying to save the notification. |
Action email notification detail screen is shown below:
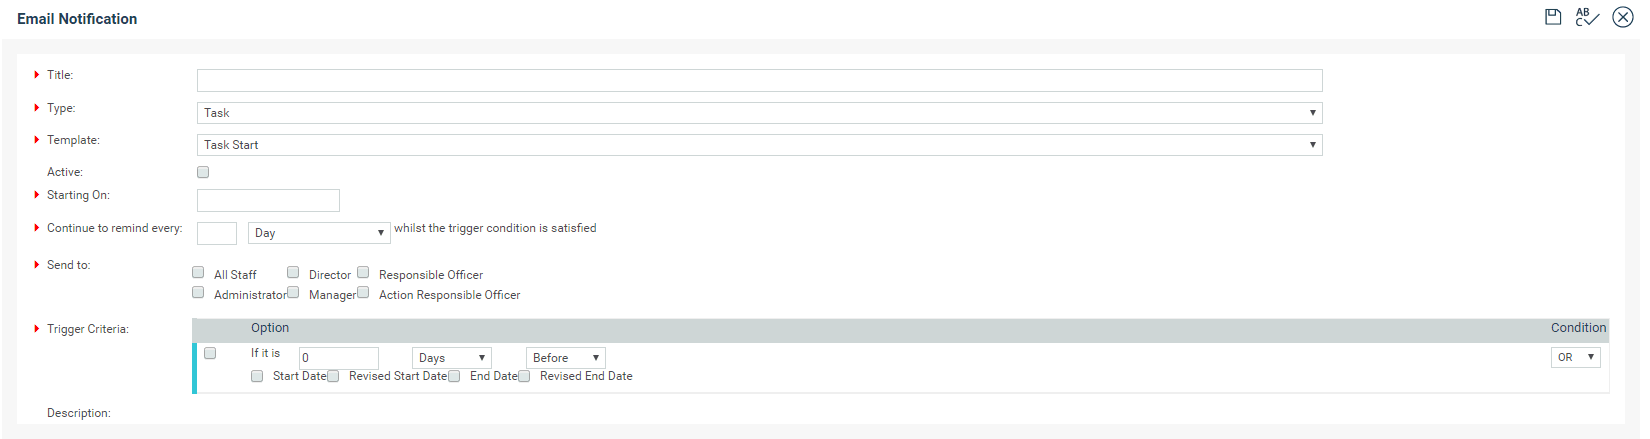
3. Task Email Notification
|
Field |
Description |
|
Title |
Define the title for the email notification |
|
Type |
Select the type of notification as Task |
|
Template |
Choose the template to be used, from the dropdown menu (templates can be edited/added under email templates tab, the dropdown menu will only provide the list of templates that was created for the relevant email type) |
|
Active |
Select the tick box if you wish to activate this email notification |
|
Start On |
Provide a date to start sending the notification NOTE: The 'starting on date' will need to be updated if you have completed a rollover and re-started your actions and tasks. |
|
Continue to remind every |
Decide the frequency of the notification from the dropdown menu. NOTE: If you choose the option as 'Never', still the email notification will be sent on the start date and will not generate any further email notification as the condition given to the email notification is not to send out alerts to remind again. |
|
Send To |
Select the recipient. The options available are All Staff, Director, Responsible officer, Administrator, Business Unit Manager and Action Responsible officer |
|
Trigger Criteria |
Define the trigger criteria using the options and conditions given in the grid. The options column gives you the list of situations in which an email can be triggered and each criteria row includes tick boxes and dropdown menus to define the criteria/situations better. These criteria can be combined using the conditions dropdown (OR/AND) given against the options. The default selection for the conditions dropdown menu is OR. Select the criteria row by ticking the check box on the left side of the row. this enables that specific trigger criteria. then you can select the options using the tick boxes or dropdown menus available in the same row. Also, you can use the conditions dropdown to combine the criteria NOTE: when a criteria is selected using the left side check box, you have to use at least one of the options available under that criteria (tick boxes or dropdown menus within the row) to define email trigger, failing which you will receive an error message when trying to save the notification. |
Task email notification details screen is shown below:
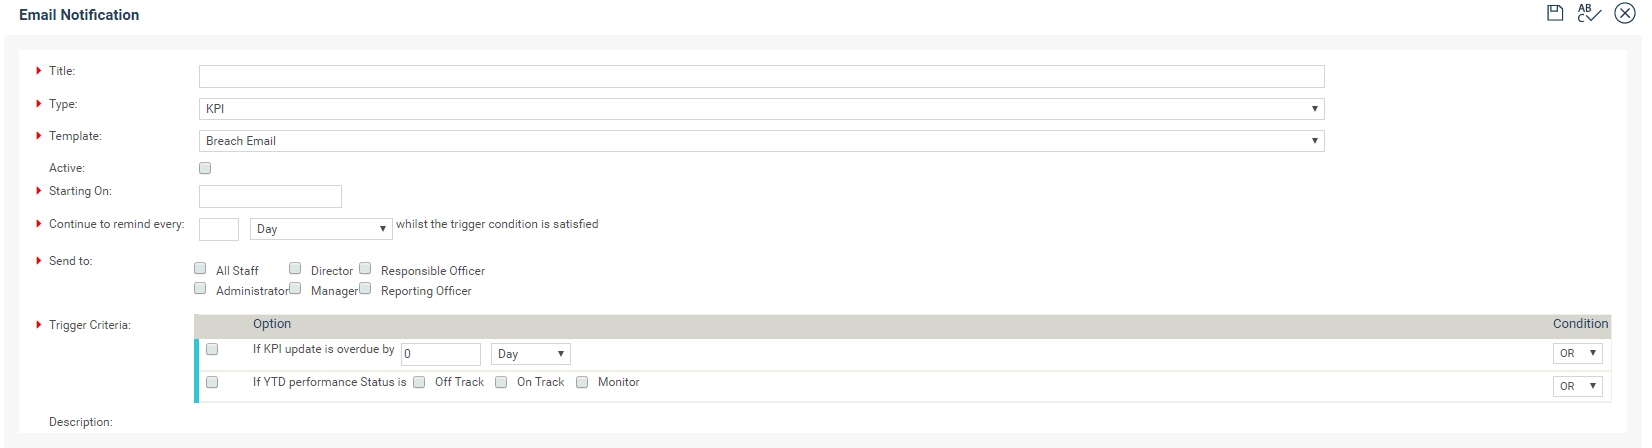
4. KPI Email Notification
|
Field |
Description |
|
Title |
Define the title for the email notification |
|
Type |
Select the type of notification as KPI |
|
Template |
Choose the template to be used, from the dropdown menu (templates can be edited/added under email templates tab, the dropdown menu will only provide the list of templates that was created for the relevant email type) |
|
Active |
Select the tick box if you wish to activate this email notification |
|
Start On |
Provide a date to start sending the notification |
|
Continue to remind every |
Decide the frequency of the notification from the dropdown menu. NOTE: If you choose the option as 'Never', still the email notification will be sent on the start date and will not generate any further email notification as the condition given to the email notification is not to send out alerts to remind again. |
|
Send To |
Select the recipient. The options available are All Staff, Director, Responsible officer, Administrator, Business Unit Manager and Reporting officer |
|
Trigger Criteria |
Define the trigger criteria using the options and conditions given in the grid. The options column gives you the list of situations in which an email can be triggered and each criteria row includes tick boxes and dropdown menus to define the criteria/situations better. These criterias can be combined using the conditions dropdown (OR/AND) given against the options. The default selection for the conditions dropdown menu is OR. Select the criteria row by ticking the check box on the left side of the row. this enables that specific trigger criteria. then you can select the options using the tick boxes or dropdown menus available in the same row. Also, you can use the conditions dropdown to combine the criteria NOTE: when a criteria is selected using the left side check box, you have to use at least one of the options available under that criteria (tick boxes or dropdown menus within the row) to define email trigger, failing which you will receive an error message when trying to save the notification. |
KPI email notification detail screen is shown below:
STEP 3: Save the details and click on close icon once you see the message informing you that the record has been saved successfully.
NOTE: Template will not be saved unless you fill all the above fields explained.
This option can be used to amend the details of an existing email notification.
STEP 1: Select the email notification you wish to amend and click on the Edit button.
STEP 2: This will take you to the details screen of the email notification. Using this screen you can amend all the required information (The same details which are given in the above table applies to this section) and once you have made the changes, click on the save icon.
The emails will always fire based on the frequency and the last lot of emails (email log) which was sent. For example, if the last log is the 21st August, so the next email will go out on the 21st September. The emails don’t look at starting on date initially, they go by the last log first.
To reset the 'starting on date' you will need to delete the last log first. If you were to delete the last log now (example, the 21st August one), you can then reset the starting date to be todays date and the email will fire out today (within an hour of your resetting this).
Therefore, for example, if you would like the email to go out as of today:
1) Remove the last email Log (21st August), through Email notification log menu
2) Reset the starting on date to be today – 17/09/2014
3) The email will fire today, and then next email will be 1 month from today.
Just a note, if you wanted to reset the email to go out any other date (not today) – say Friday, then:
1) Remove the last Log (21st August)
2) Reset the starting on date to be the date you want it to go out (Friday = 19th Sept)
3) The email will fire on Friday – 19th Sept and then next email will be 1 month from the 19th Sept
STEP 1: Select the email notification you wish to remove/delete and click on the Delete button.
STEP 2: You will see a pop up message asking you to confirm the deletion, Click OK button.
If you wish to activate or deactivate an email notification, all you have to do is, tick (to activate)/ untick (to deactivate) the 'Active' check box under the details screen, and save the change.
Copyright © 2014-2015 CAMMS Online Help. All rights reserved.
Last revised: November 26, 2017