 |
This is a Premium feature. Please contact CAMMS Helpdesk for more information. |
|
This is a Premium feature. Please contact CAMMS Helpdesk for more information. |
The Risk Assessment allows you to adjust various settings used within the Risk Assessment object. It comprises a range of tabs which can be utilised to define variables and criteria for the risk assessment process.
STEP 1: Go to 'Framework> Project Settings> 'Risk Assessment'.
The risk criteria screen can be utilised to input the various criteria and ratings used in the risk assessment process.
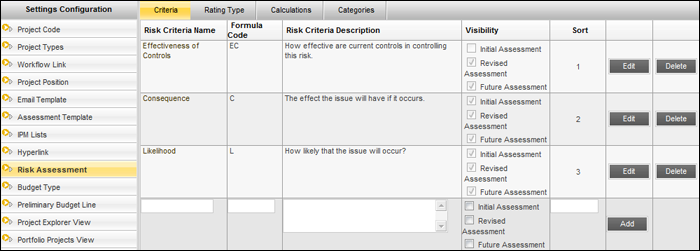
STEP 2: To create risk criteria, specify the following details:
|
Field |
Description/Instruction |
Mandatory/Optional |
|
Risk Criteria Name |
Name of the Risk Criteria |
Mandatory |
|
Formula Code |
Formula Code, which will be used in the Risk Rating Formula |
Mandatory |
|
Risk Criteria Description |
Description of the Risk Criteria |
Mandatory |
|
Visibility |
Indicates the visibility of the Risk Criteria in the Initial and/or Revised and/or Future Risk Assessments |
Mandatory |
|
Sort |
Indicates the positioning of the Risk Criteria Fields in the Initial, Revised and Future Assessments Screens. The system will not allow adding the same 'Sort' value twice |
Mandatory |
STEP 3: Click 'Add' to save the details. Similarly, use 'Edit' to make any modifications or 'Delete' to remove the risk criteria details from the system.
Once a Risk Criteria is saved, you will be able to drill down on a particular Risk Criteria via the title hyperlink. You can then define various headings and rating values which can be used when calculating the risk ratings for a particular issue.
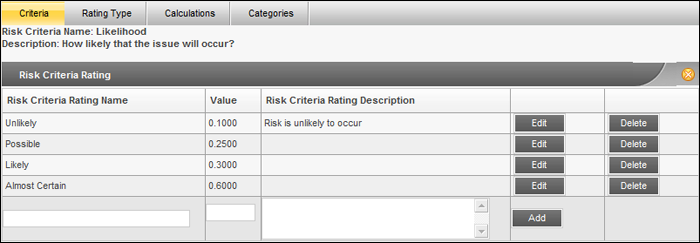
STEP 4: The following details can be specified here.
|
Field |
Description/Instruction |
Mandatory/Optional |
|
Risk Criteria Rating Name |
Name of the risk criteria name |
Mandatory |
|
Value |
Value assigned for the risk criteria rating |
Mandatory |
|
Description |
Description of the criteria (description is used as a tool tip). |
Mandatory |
STEP 5: Click 'Add' to save the details in the system. Similarly, use 'Edit' to make any modifications or 'Delete' to remove the risk criteria rating details from the system.
STEP 6: Click 'Rating Type' to access the Risk Rating Type configuration area.
Within Rating Type area you could set up your own risk assessment rating levels and icons. You could also change the graph chart colours for each rating levels (series).

Follow the steps below to create a risk rating.
STEP 7: Specify the following details.
|
Field |
Description/Instruction |
Mandatory/Optional |
|
Risk Rating Type Name |
Name the Risk Rating Type |
Mandatory |
|
Image |
Image of the Risk Rating Type. Click the image place holder to select an image or you can upload a new image. |
Mandatory |
|
Colour |
Colour to be displayed in the graphs. Using the colour selection palette, set a colour to represent that risk rating type. NOTE: These colours will be applied for all risk stages (Initial, Revised and Future Risk) and you will be able to define calculation for the rating type. By default, black is assigned to any Risk Rating Type. |
NA |
|
Sequence |
Sort the Risk Rating Type, from lowest to highest |
Mandatory |
STEP 8: Click 'Calculations' to access the Risk Criteria Calculation configuration area which allows you to set up the calculations for initial, revised and future risk assessment phases.
The Risk Rating Formula can be set to calculate the Initial/Revised or Future Risk Rating for a risk issue. You can edit the minimum and maximum values for the risk rating range.
|
The Formula can contain only the Operators and Criteria Options specified in the legend. Also, it is important to ensure that there are no gaps between the maximum value of a rating and the minimum value of the next highest rating. This will ensure that any combination of Risk Criteria will generate a Risk Rating. |
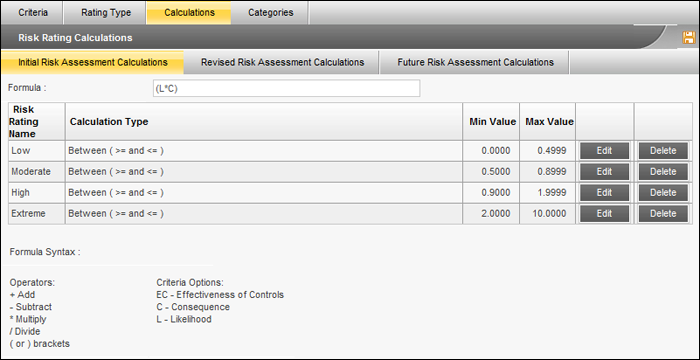
STEP 9: Specify the following.
|
Field |
Description/Instruction |
Mandatory/Optional |
|
Formula |
Formula which will be used in the Risk Calculation |
Mandatory |
|
Calculation Type |
Select the type from the drop down list |
Mandatory |
|
Min Value |
Minimum value assigned for the risk rating |
Mandatory |
|
Max Value |
Maximum value assigned for the risk rating |
Mandatory |
STEP 10: Click 'Save'. Use 'Edit' to change the minimum/maximum values.
|
There is no validation for the risk rating formula if the calculation results the rating above or below the minimum and maximum values of the respective risk ratings. If a risk rating does not appear after the necessary fields have been selected and the assessment is saved, the risk rating formula must be adjusted. If you are not sure of inputting a formula, use the default formula provided by CAM Management Solutions. |
: Click 'Categories' to access the Risk Categories configuration area. Risk Categories setup here can be selected within Initial Risk Assessments.
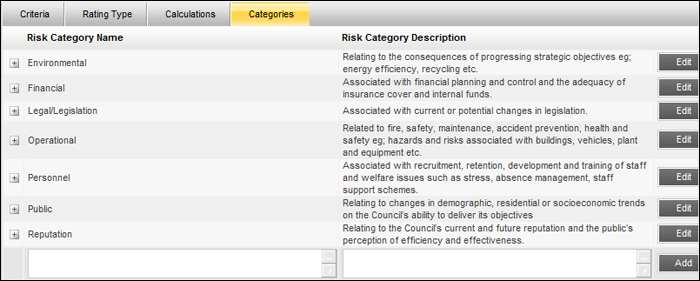
STEP 12: Specify the following details.
|
Field |
Description/Instruction |
Mandatory/Optional |
|
Risk Category Name |
Name of the risk category |
Mandatory |
|
Risk Category Description |
A brief description of the risk category |
Optional |
STEP 13: Click 'Add' to save the details. Use 'Edit' to change the risk category configuration details.
Sub Categories
You can also create sub categories for each main category. The sub category will be displayed in the user view once the main category is selected as shown below.
However only the main categories are displayed in the revised assessment section.
 |
Note that all amendments done to Risk Criteria, Risk Rating Type, Risk Calculations and Risk Categories from here will be reflected in the ‘Risk’ Settings area and vice versa. |
Copyright © 2014-2015 CAMMS Online Help. All rights reserved.
Last revised: November 26, 2017