 |
This is a Premium feature. Please contact CAMMS Helpdesk for more information. |
|
This is a Premium feature. Please contact CAMMS Helpdesk for more information. |
The Asset Configuration area allows configuring an asset hierarchy and the relevant data entry fields which are displayed to the users at the interface level of the project workflow.
STEP 1: Go to Settings Configuration > Asset Configuration.

STEP 2: Click 'Add New Asset Hierarchy Level' to add a new asset hierarchy level.
STEP 3: Specify a name in the Hierarchy Name field.
STEP 4: Click 'Save' to add the level to the hierarchy.

The system pops up a screen message giving instructions on how to configure the newly created asset level.
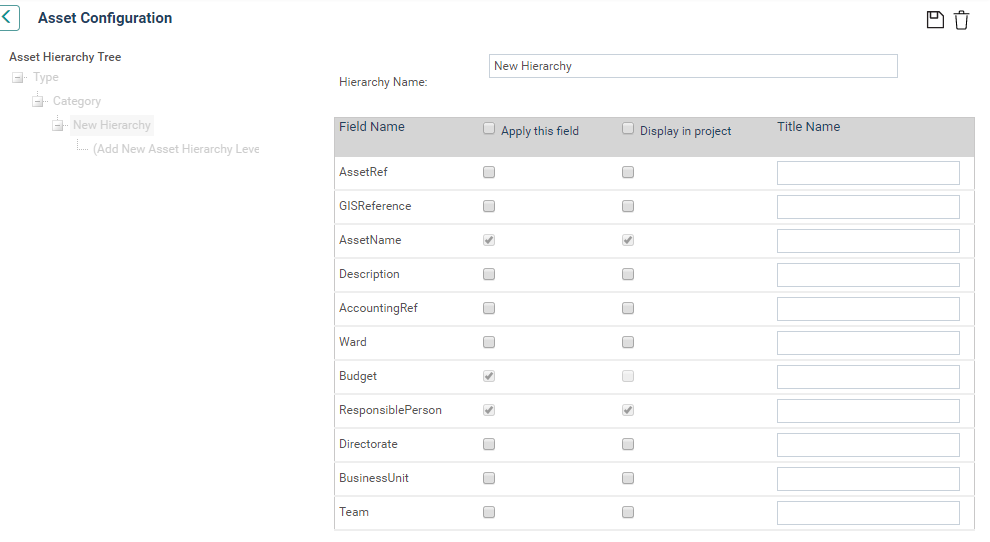
TEP 5: Now you can set up the asset level field configuration as follows:
|
Field |
Description/Instructions |
Mandatory/Optional |
|
Apply this field |
Enables this Asset level within the Asset Setup |
Optional |
|
Display in project |
Makes this field visible at the project level |
Optional |
|
Title Name |
Enter a custom label to be displayed when users browse assets at the project level |
Optional |
| |
Options for some fields are fixed and cannot be modified (e.g. Asset Name is always enabled within Asset Setup and visible within projects) |
STEP 6: Click 'SAVE' to commit your changes. Repeat this as many times as required to build your tree hierarchy.
STEP 7: Click 'DELETE' to remove an existing hierarchy level. Remember that asset hierarchy levels can only be deleted if they do not have any child assets under them.
Copyright © 2014-2015 CAMMS Online Help. All rights reserved.
Last revised: November 26, 2017